9 min. reading
How to Visualize a Bathroom with Paintit.ai
Yulii Cherevko
CEO paintit.ai
Page Contents:
- 1. Why Bathrooms Are Technically Sensitive
- 2. What Makes a Strong Bathroom Result
- 3. Wet-Zone Logic First
- 4. How to Build a Better Bathroom Prompt
- 5. Bathroom Prompt Cards
- 6. How to Compare Bathroom Directions
- 7. Advanced Bathroom Techniques
- 8. Frequently Asked Questions
- 9. Related articles
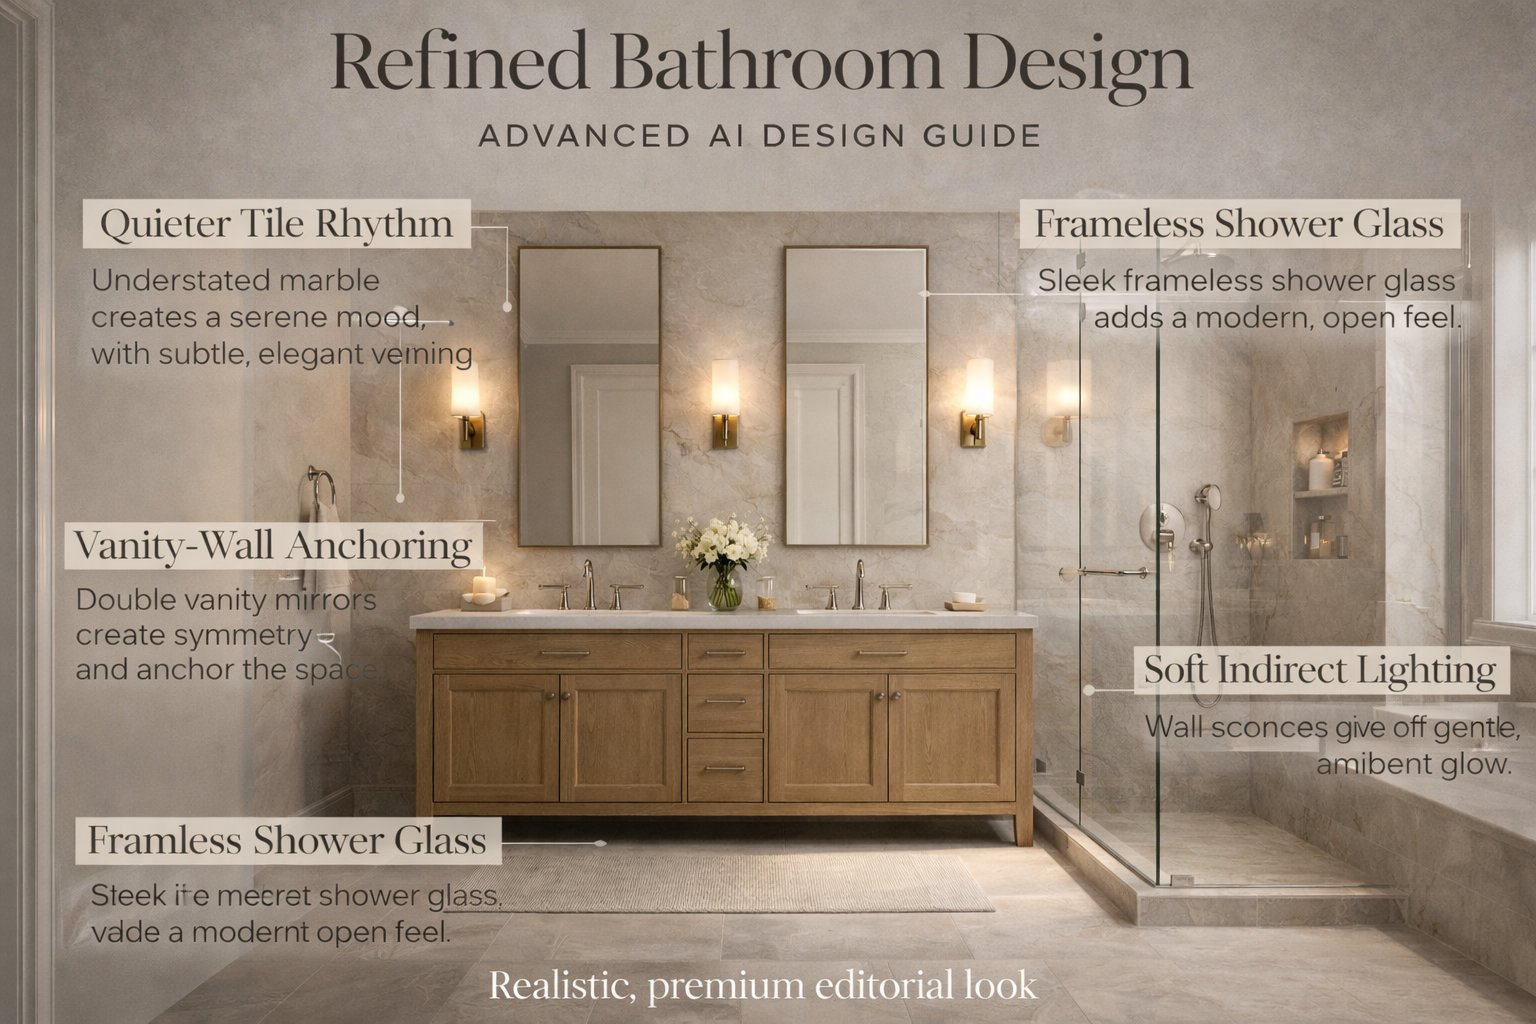
Bathrooms are one of the most detail-sensitive spaces in Paintit.ai. Small changes in materials, lighting, glass, vanity proportion, and wet-zone logic can dramatically affect realism. This guide shows how to get cleaner, more believable bathroom concepts with better prompt control and stronger design structure.
Why Bathrooms Are Technically Sensitive
Bathrooms fail faster than many other rooms because the eye notices proportion, joints, and wet-zone logic immediately.
In a bathroom, realism depends less on big furniture moments and more on compact technical relationships: vanity size, mirror placement, shower geometry, tile scale, grout visibility, glass reflections, fixture consistency, and light quality. If one of these feels wrong, the whole concept often feels less believable.
What makes bathroom design more technical
Material repetition is high — tile, stone, glass, metal, and grout appear everywhere, so inconsistency becomes obvious.
Scale matters more — oversized vanities, awkward mirrors, or incorrect shower proportions break realism quickly.
Wet and dry zones matter — the room should feel functionally organized, not randomly composed.
Lighting is unforgiving — hard light, flat light, or unrealistic glow can make surfaces feel fake.
This is why good bathroom prompts usually need more material precision and stronger restraint than generic interior prompts.
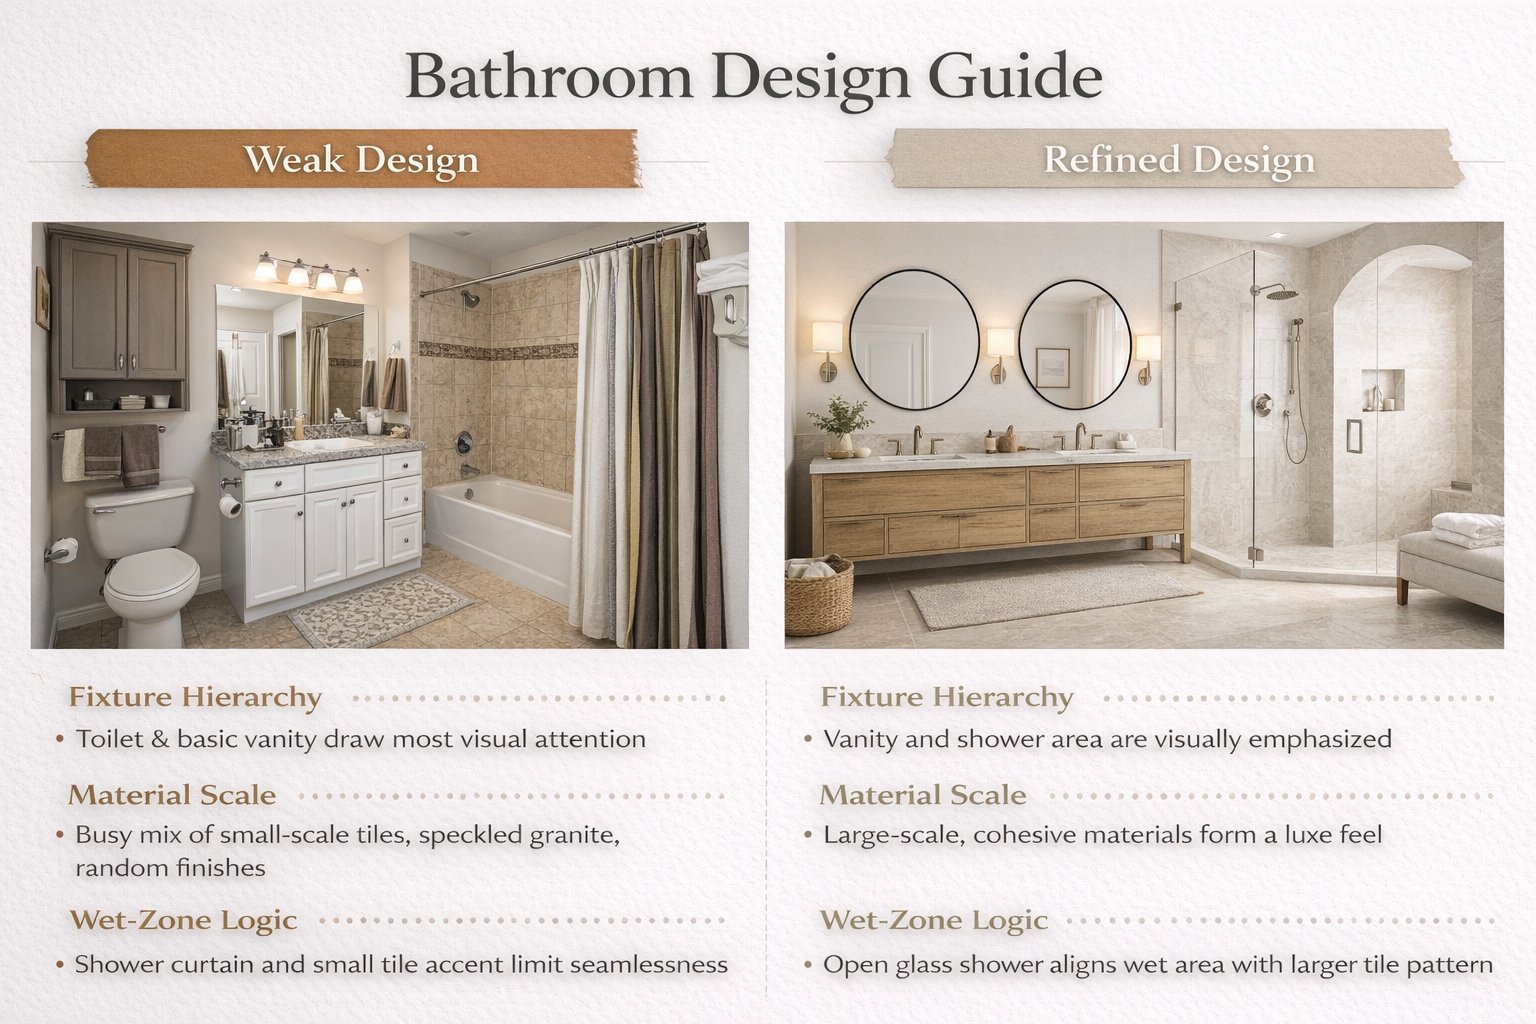
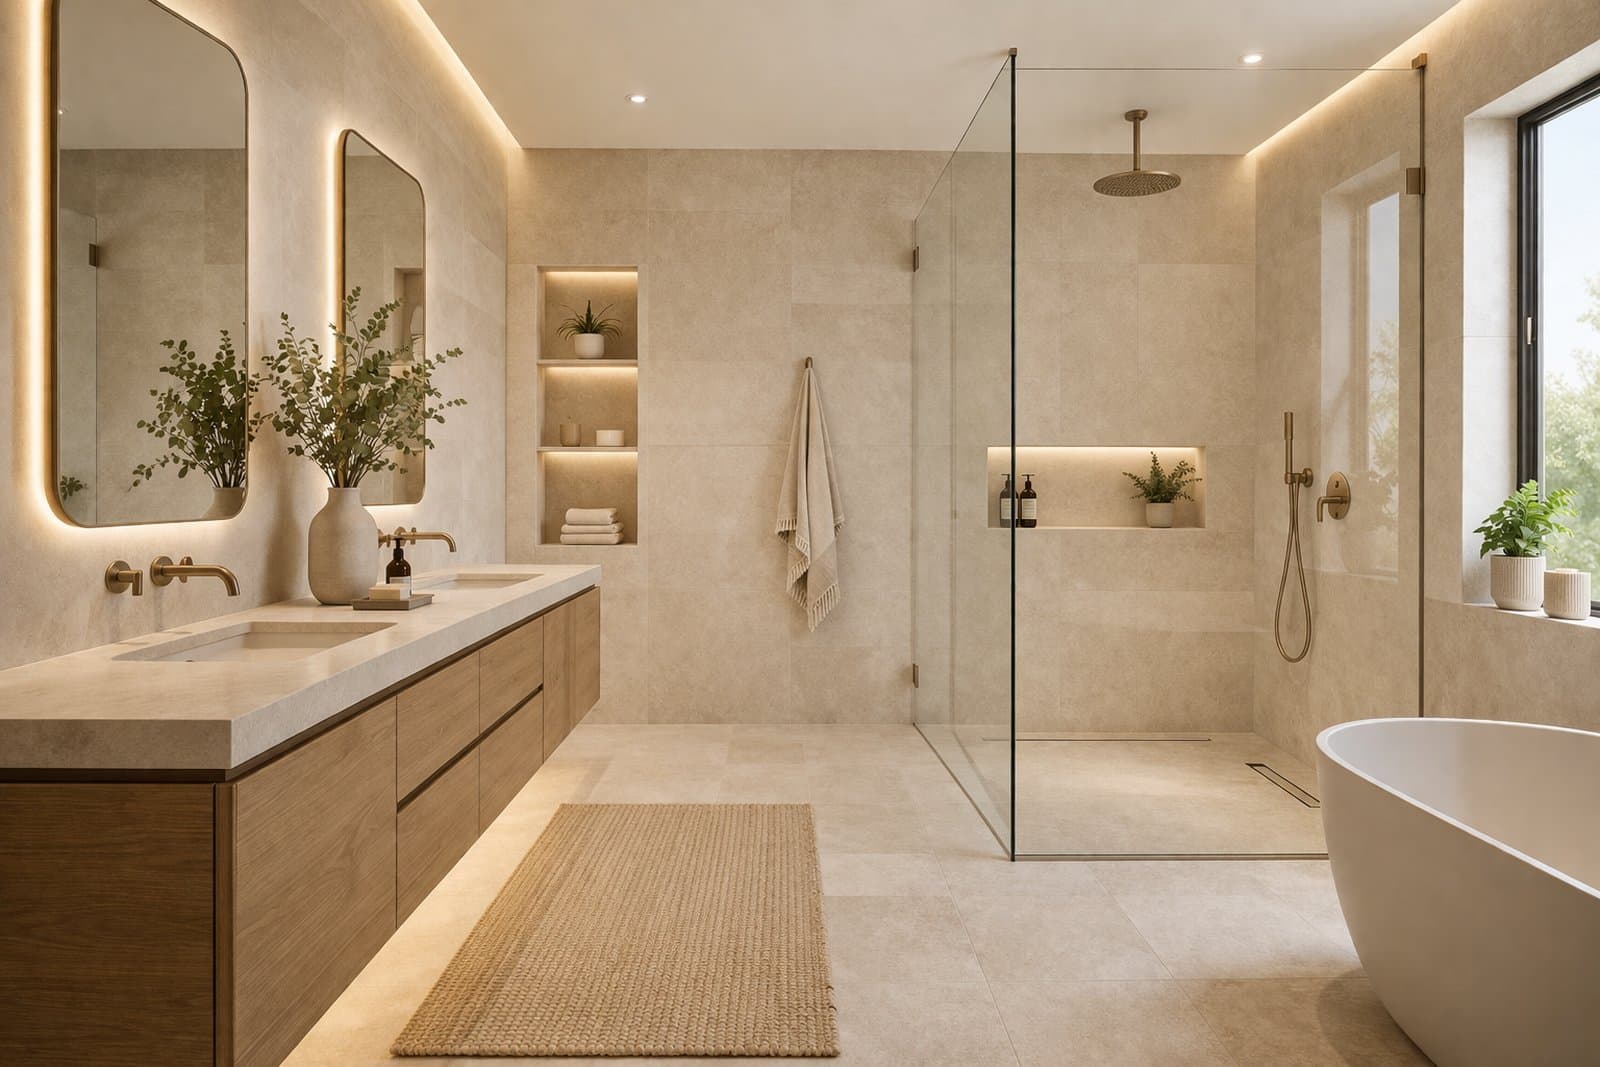
What Makes a Strong Bathroom Result
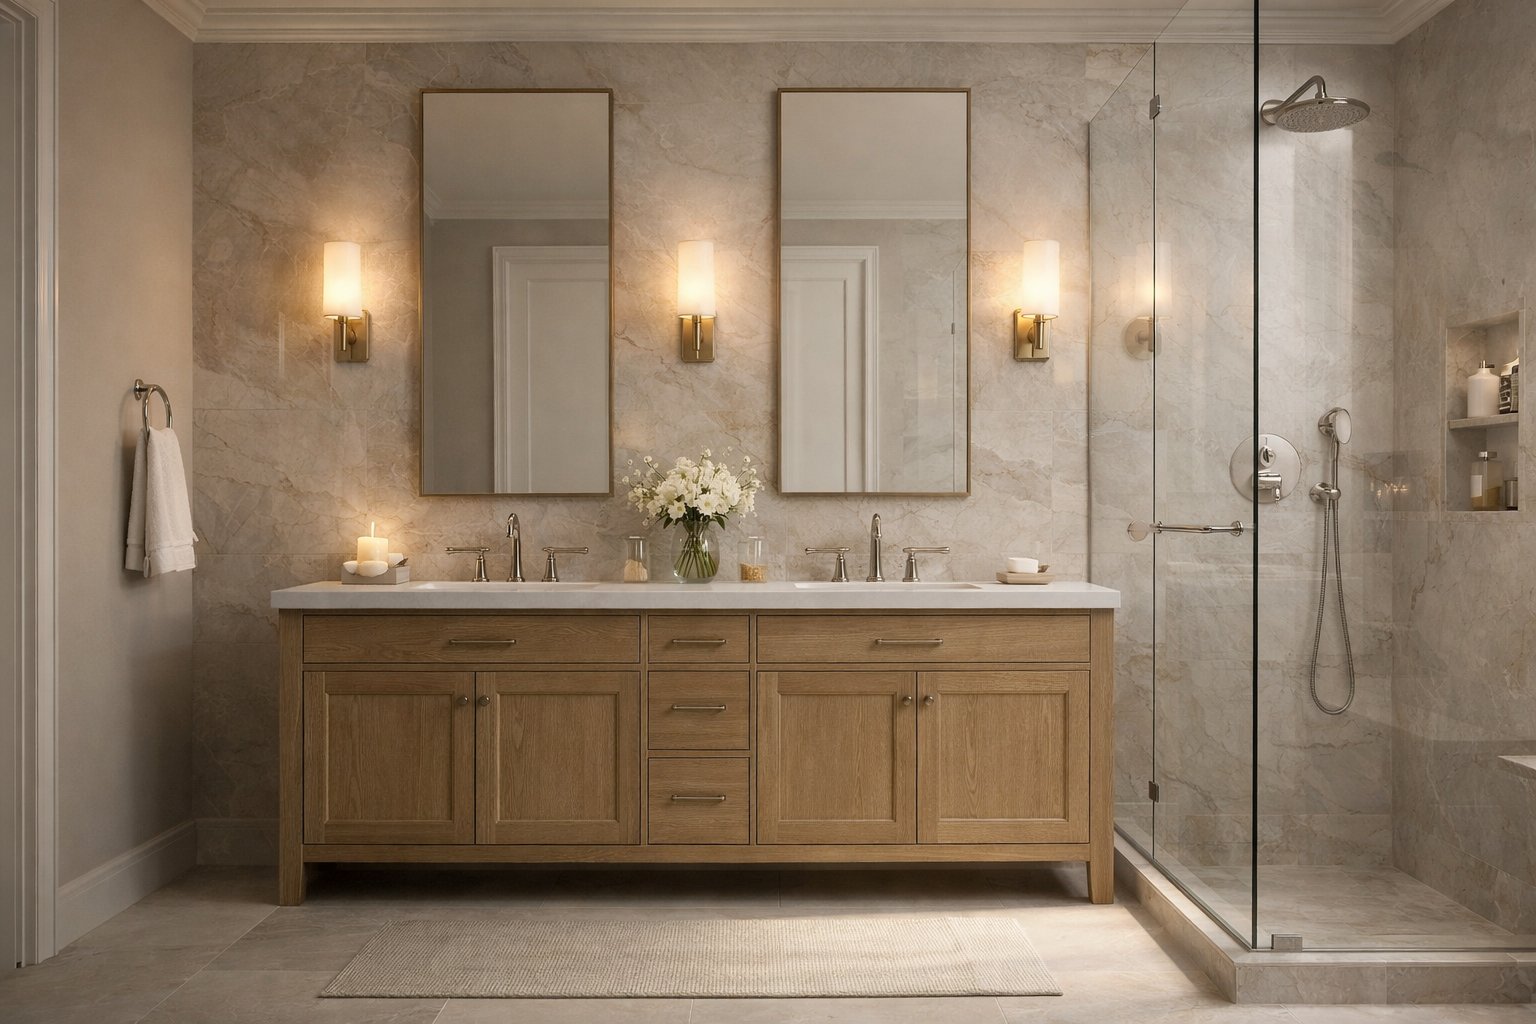
The best bathroom concepts feel calm, clean, buildable, and physically believable.
A strong Paintit.ai bathroom result should look composed, not overloaded. It should feel like a real room where the materials, fixtures, and lighting belong to the same system.
A strong bathroom result usually gets these things right
Clear fixture hierarchy — vanity, mirror, shower, and tub read as a coordinated set.
Believable material scale — tile size, slab logic, grout presence, and stone surfaces feel plausible.
Controlled visual noise — enough detail to feel premium, but not so much that the room becomes busy.
Soft reflective balance — mirrors and glass feel realistic without becoming harsh or visually chaotic.
Consistent mood — spa-like, minimal, warm, or contemporary, but clearly one direction.
In bathroom design, fewer stronger decisions often produce better results than adding more decorative complexity.
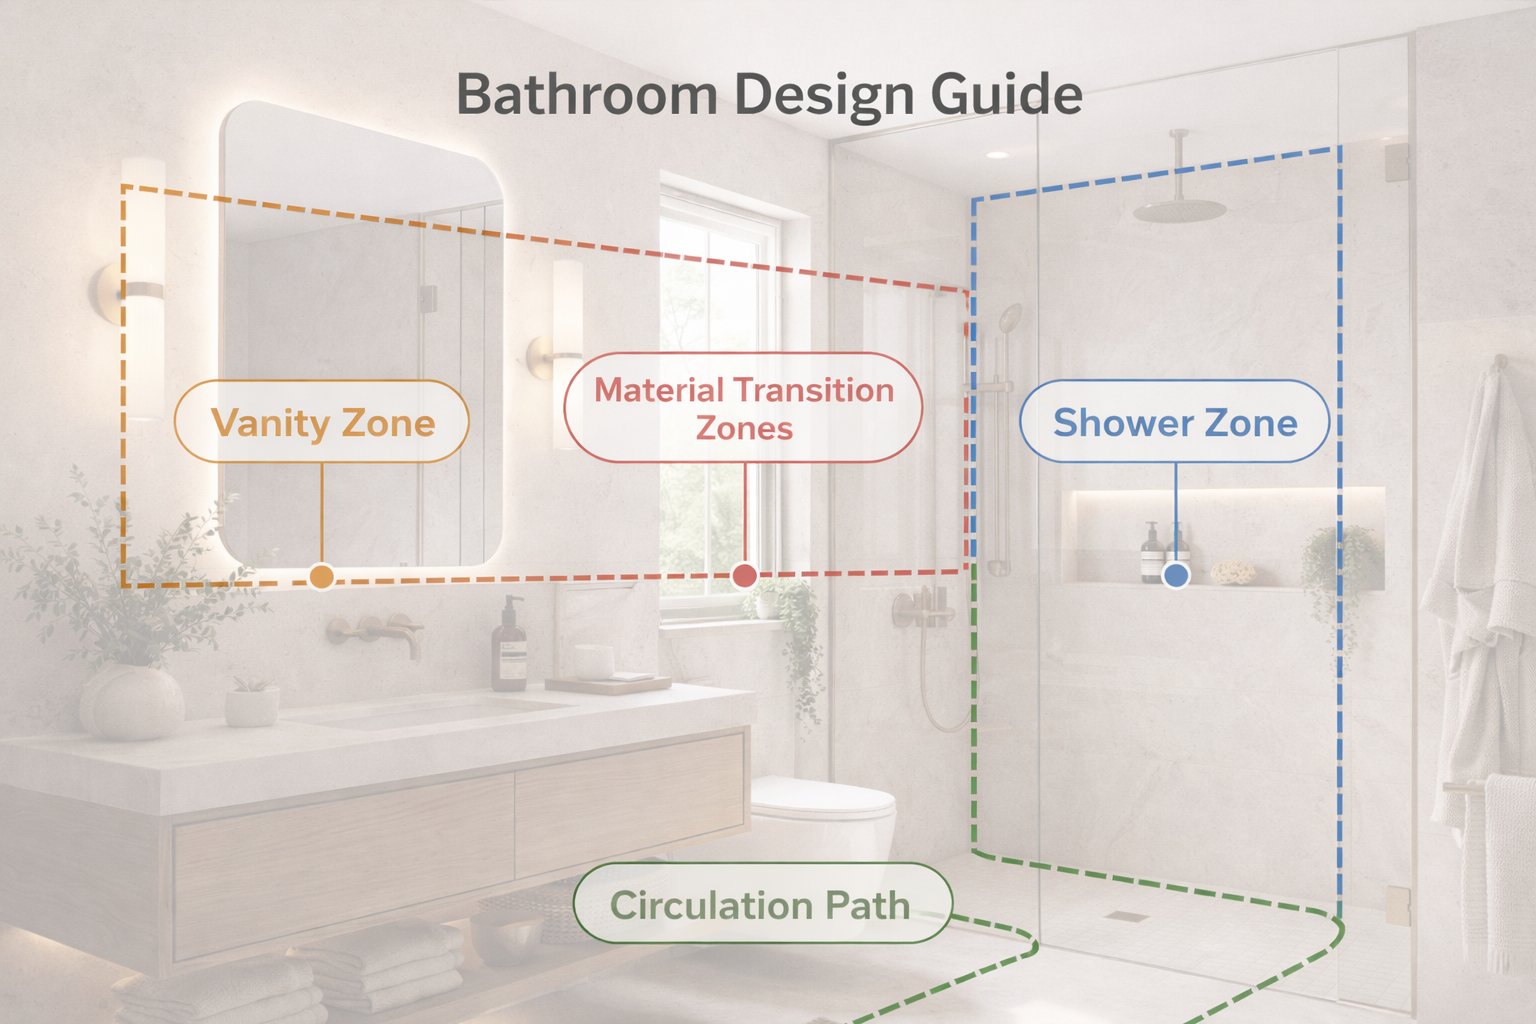
Wet-Zone Logic First
A bathroom should read like a real functional system, not just a styled image.
One of the best ways to improve bathroom outputs is to think in zones. The room usually becomes much more believable when Paintit.ai is guided by a simple spatial logic: wet zone, vanity zone, and circulation.
The 4 bathroom anchors to think about first
Vanity wall — where the mirror, sink, and storage are visually anchored.
Shower or bath zone — the primary wet area and how it is separated.
Material transitions — where tile, stone, paint, plaster, or glass begin and end.
Circulation — whether the room still feels usable and spatially logical.
If the room feels confused, do not immediately add more style language. First make the zoning cleaner. Strong bathroom results usually come from better organization, not more decoration.
Technical tip
If the source bathroom already has workable plumbing logic, keep the layout unchanged first and only redesign surfaces, vanity language, lighting, and finish quality. This usually increases realism.
How to Build a Better Bathroom Prompt
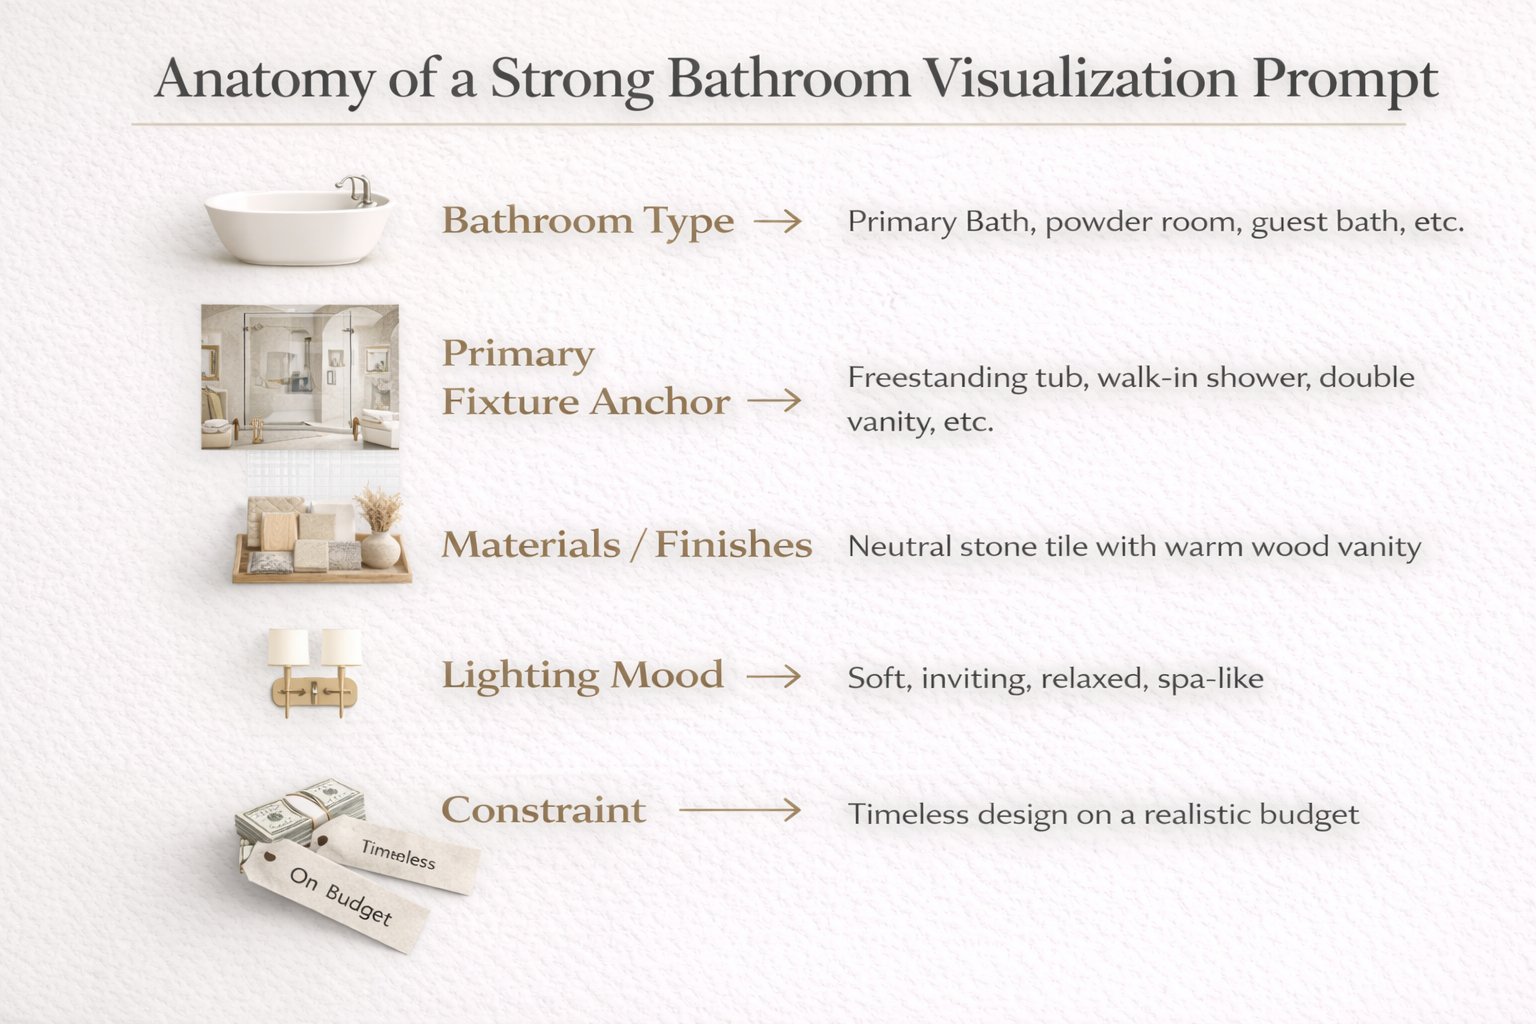
The strongest bathroom prompts define fixtures, materials, mood, and control with unusual precision.
Weak bathroom prompts usually rely only on adjectives like luxury, beautiful, or modern. Stronger ones define what kind of bathroom it is, which fixture should anchor the room, what material system should dominate, and what geometry should stay stable.
A practical bathroom prompt structure
[Bathroom type] + [Style direction] + [Primary fixture anchor] + [Materials or finishes] + [Lighting mood] + [Constraint]
What to define more clearly
Bathroom type — primary bathroom, guest bathroom, powder room, compact ensuite, spa-style bathroom.
Primary anchor — floating vanity, frameless shower, freestanding tub, double vanity, feature mirror wall.
Materials — beige stone, light terrazzo, warm plaster, travertine, matte tile, brushed brass, black fixtures.
Lighting mood — soft indirect lighting, diffused daylight, calm spa-like glow, clean natural light.
Constraint — keep layout, plumbing logic, mirror wall, openings, or proportions unchanged when needed.
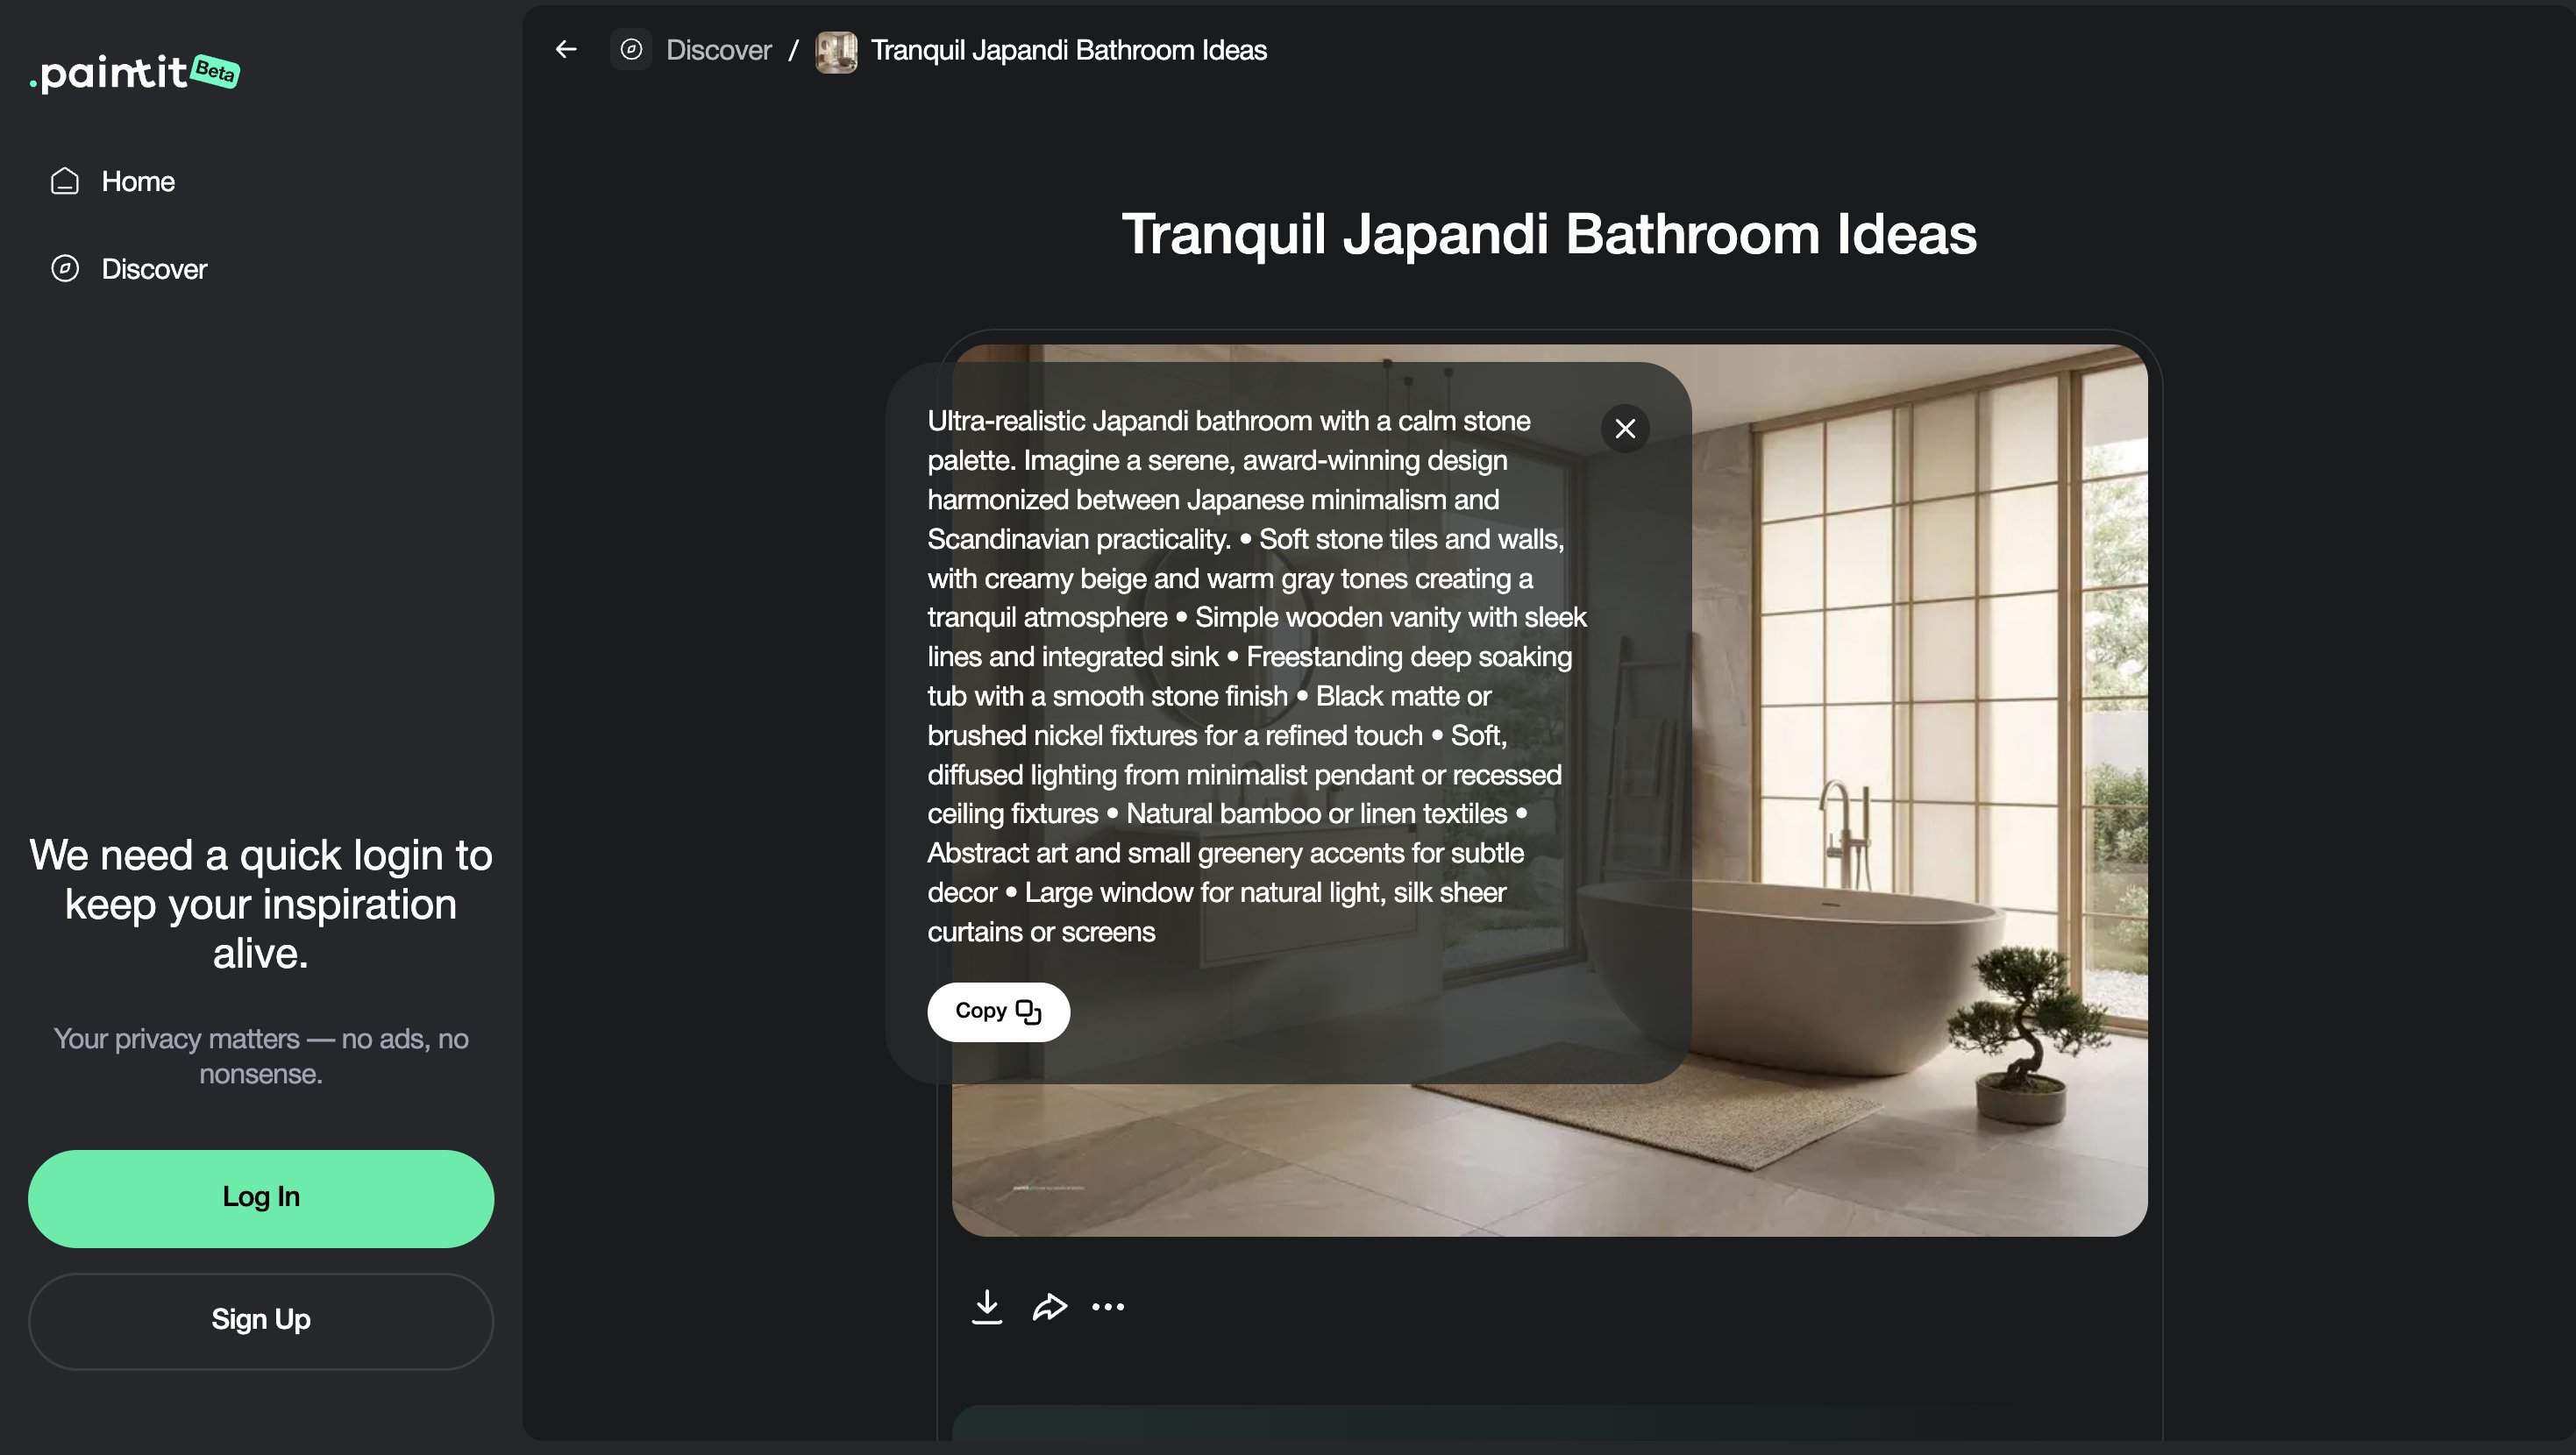
Example of a technically stronger bathroom prompt:
Redesign this bathroom as a calm spa-style space with a floating vanity, soft beige stone surfaces, frameless glass shower, brushed metal fixtures, indirect warm lighting, and a premium minimal atmosphere. Keep the layout and shower position unchanged.
This works better because it defines fixture hierarchy, material family, light character, and control in one clear system.
Bathroom Prompt Cards
Use these as copy-ready starting points for the most useful bathroom directions.
Core bathroom prompt cards
Spa-style bathroom
Redesign this bathroom as a calm spa-style space with a floating vanity, soft beige stone finishes, frameless glass shower, brushed metal fixtures, and indirect warm lighting. Keep the layout and plumbing logic unchanged.
Warm contemporary bathroom
Transform this bathroom into a warm contemporary design with a clean vanity wall, muted stone-look surfaces, subtle black accents, soft daylight, and a controlled premium feel. Preserve the room proportions and openings.
Minimal soft bathroom
Redesign this bathroom as a soft minimal space with smooth warm plaster tones, a simple floating vanity, quiet mirror lighting, and restrained styling. Keep the shower position and layout unchanged.
Special-use bathroom cards
Compact guest bathroom
Turn this small bathroom into a refined guest bathroom with a compact floating vanity, light neutral palette, clean mirror wall, subtle tile rhythm, and a brighter open feel. Keep the layout unchanged.
Double vanity primary bathroom
Redesign this bathroom as an elegant primary bathroom with a double floating vanity, soft stone surfaces, balanced mirror lighting, calm neutral palette, and premium spa-like mood. Preserve the room structure and wet-zone layout.
Best practice: decide the dominant material family first, then the fixture character, then the lighting softness. That order usually produces stronger bathroom outputs.
How to Compare Bathroom Directions
Bathroom comparison works best when the versions differ by material system and mood, not random decoration.
Because bathrooms are compact, small changes often have a big effect. That means comparison should focus on material hierarchy, light quality, and fixture feel more than on lots of decorative variation.
A useful comparison framework
Version 1 — light and clean
Version 2 — warmer and softer
Version 3 — darker premium contrast
Version 4 — restrained spa-like winner
This helps you compare complete material and atmosphere systems instead of only swapping surface colors without direction.
Advanced Bathroom Techniques
These small technical decisions often separate average bathroom outputs from truly premium ones.
Technique 1 — Control grout noise
If the bathroom feels visually busy, reduce tile fragmentation. Larger-format surfaces or quieter tile language often improve calmness.
Technique 2 — Anchor the vanity wall
Mention the vanity as a primary feature if the room lacks hierarchy. This helps organize mirror, light, and storage logic.
Technique 3 — Keep glass simple
Frameless or cleaner shower glass directions often read more premium and less visually noisy.
Technique 4 — Specify light softness, not only brightness
“Soft indirect lighting” usually produces a calmer result than generic “bright bathroom lighting.”
Technique 5 — Use fewer material families
Bathrooms usually get stronger when stone, tile, metal, and wood feel part of one restrained system instead of competing layers.
In bathrooms, refinement usually comes from editing down, not from adding more.
Frequently Asked Questions
What is the most important part of a bathroom visualization?
Usually the relationship between fixture hierarchy, material scale, and wet-zone logic. If those are weak, the bathroom will feel less believable.
How do I make a bathroom feel more premium?
Use fewer stronger materials, cleaner glass, quieter tile rhythm, softer lighting, and a clearer vanity or fixture anchor.
Should I keep the layout unchanged?
In most cases, yes at first. Bathrooms become more believable when the existing plumbing logic and room geometry are respected.
What is the biggest technical mistake in bathroom prompts?
Asking for luxury or beauty without defining the main fixture anchor, material family, and control over layout.
How many bathroom directions should I compare?
Usually three to four materially different directions are enough before refining one final system.
How do I reduce visual clutter in a bathroom result?
Reduce small tile fragmentation, simplify the material palette, keep fixtures coordinated, and use softer lighting language.
Try a Bathroom Redesign
Upload your bathroom, define a cleaner material and lighting system, and turn it into a more believable, premium, and better-structured concept with Paintit.ai.
Related articles
Trending
How to Design a Kitchen with Paintit.ai
How to Visualize a Bathroom with Paintit.ai
How to Design a Bedroom with Paintit.ai
Neo Deco Paint Techniques: Creating Glamorous Geometric Walls
Is There an App to Remodel My Bathroom with Just a Photo?
Related articles
9 min read
How to Redesign a Home Exterior with Paintit.ai
Learn how to redesign a home exterior with Paintit.ai using better facade logic, cleaner material systems, realistic curb-appeal upgrades, stronger prompt control, and more believable exterior concepts
Yulii Cherevko
CEO paintit.ai
9 min read
How to Design a Kitchen with Paintit.ai
Learn how to design a kitchen with Paintit.ai using stronger layout logic, better cabinet rhythm, cleaner material systems, realistic appliance placement, and more believable kitchen concepts
Yulii Cherevko
CEO paintit.ai

9 min read
How to Visualize a Bathroom with Paintit.ai
Learn how to visualize a bathroom with Paintit.ai using better wet-zone logic, cleaner material prompts, realistic scale, stronger lighting control, and more believable bathroom concepts
Yulii Cherevko
CEO paintit.ai
9 min read
How to Design a Bedroom with Paintit.ai
Learn how to design a bedroom with Paintit.ai using better bed placement logic, calmer palettes, stronger prompts, realistic furniture scale, and more controlled bedroom concepts
Yulii Cherevko
CEO paintit.ai